Imagine you’re flying your FPV drone at full throttle, performing crazy stunts in the air 🚀. Everything is going as smoothly as a dream until… F*ck, signal dropout! But fear not, esteemed FPV pilots, because today we dive into the superhero world of failsafe 🦸♂️. It’s like your quad’s loyal sidekick, ready to save your race or line when your transmitter signals decide to take a break. In this guide, we’ll shed light on failsafe, starting from distinguishing its two phases to precise setup for pros. So buckle up (or should we say, arm your drone?), because we’re about to embark on a failsafe adventure that even your drone will give you a high five for!
Key Takeaways
- Failsafe serves as a critical safety net, preventing your drone from spiraling out of control in the event of a signal loss or interruption.
- Protecting others during failsafe events is paramount, making the understanding and proper configuration of failsafe a vital aspect of drone piloting.
- Betaflight has two stages of failsafe: stage one and stage two.
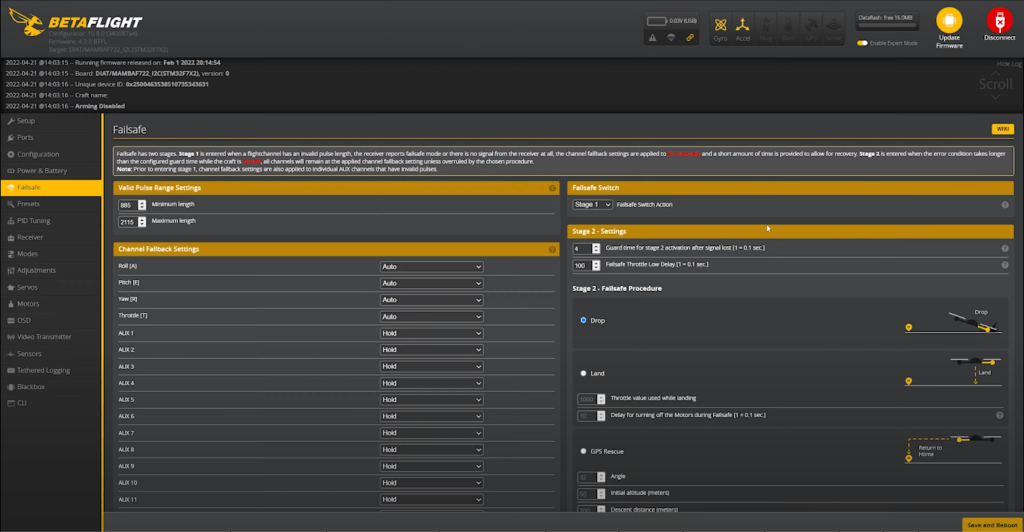
- To configure fail safe in Betaflight, navigate to the failsafe tab and adjust the settings according to your preferences.
Understanding Failsafe: A Safety Net for Your FPV Drone
As a drone pilot, grasping the essence of a failsafe is imperative. Fail Safe acts as a built-in safety mechanism in drone flight controllers, intervening to avert accidents and drone damage. It comes into play when your drone encounters two scenarios: flying too far from the controller, leading to a radio link dropout, or a receiver power-down or signal wire interruption to the flight controller.
Where and How to Configure Failsafe?
Configuring failsafe involves navigating the failsafe tab, and adjusting settings based on your preferences. This crucial step is emphasized in Betaflight and DJI systems, requiring attention to detail to ensure your drone responds appropriately in the face of potential signal losses. Always bear in mind the responsibility of protecting others, making failsafe configuration an ethical obligation.
Two Stages of Failsafe
Betaflight introduces two failsafe stages: stage one and stage two.
Stage one aims to prevent abrupt falls by allowing the drone to continue flying normally during short control dropouts. Stage Two, designed for advanced actions, comes into play when more sophisticated responses are needed, offering a comprehensive failsafe configuration for various scenarios. Understanding the nuances of each stage is essential for effective failsafe configuration.’
Stage One Failsafe: Maintaining Control Until Transition to Stage Two
During brief control outages, Stage One Failsafe activates for a defined guard time. This period, which defaults to 0.4 seconds, allows the drone to resume normal operation once the failsafe condition ends. In Stage One Failsafes, the focus is usually on the FPV drone simply continuing to fly until the signal is restored. To achieve this, the channels adhere to the values set in the channel fallback settings – there are Auto, Hold, and Set options for Roll, Pitch, Yaw, and throttle channels.
Guard Time: A Crucial Delay Before Stage Two
The guard time for activating Stage Two determines the duration of Stage One Failsafe.
You can set in tenths-of-a-second increments how long it takes for Stage Two to activate.
Note: There is another option, GPS rescue, which will come after the guard time expires. This option will attempt to return the drone to its home point using GPS coordinates.
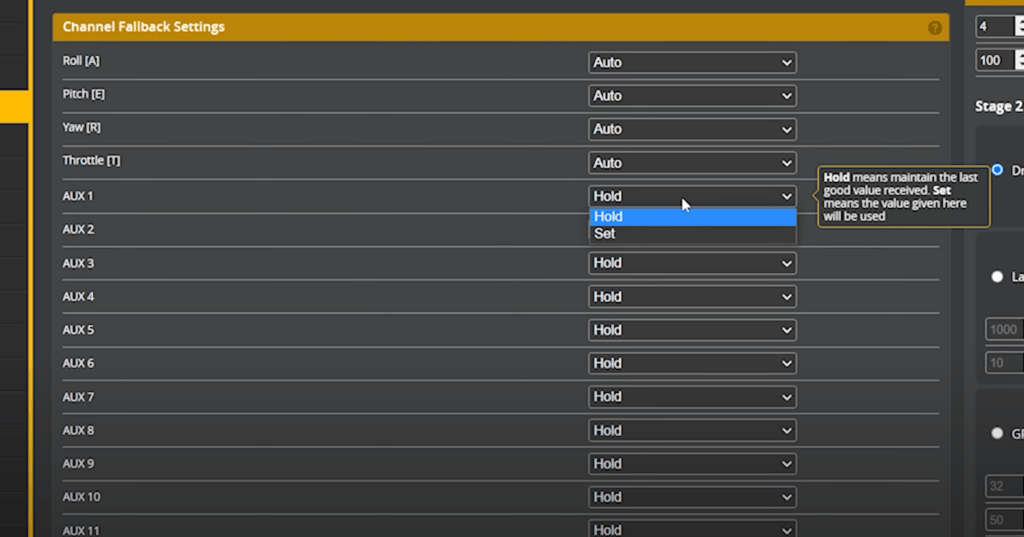
Channel Fallback Settings
As the flight controller enters stage one failsafe, channels react based on configurations in channel fallback settings. For roll, pitch, yaw, and throttle channels, auto, hold, and set options dictate post-failsafe behavior. Understanding and customizing these settings are essential for tailoring failsafe behavior to your preferences.
With the guard time in place, you’ve effectively bought yourself some time to regain control of the drone before Stage Two Failsafe kicks in. We’ll look at the transition to stage two failsafe below.
So when the flight controller enters stage one failsafe, all of the channels will do what they are configured to do here in the channel fallback settings. For the roll, pitch, yaw, and throttle channels,
These are the three options:
- Set: This channel will go to a preset value that you choose.
- Hold: The channel will hold its last input value that it was at before it went into stage one failsafe.
- Auto: For roll, pitch, and yaw, auto means that the channel will go to center, and for throttle, the channel will go to low.
Details of Channel Fallback Settings
Diving deeper into channel fallback settings, let’s explore the nuances of each option:
Set Option
The Set Option allows specifying a fixed value for a channel during Stage One Failsafe. Although not recommended for multirotors, it is often used in fixed-wing aircraft (Fixedwing) to ensure control surfaces assume a predetermined position.
Some FPV pilots set the throttle to a specific low value, intending to keep the drone hovering evenly in the air in most cases. However, we recommend using the Auto setting for this purpose.
Hold Option
The Hold Option locks the channel at its last input value before entering Stage One Failsafe. This ensures that the drone maintains its state before the Failsafe. Simply put: If you were flying in a curve before, the quad will continue to fly in a curve.
For experienced pilots, it may be an option to set Roll, Pitch, and Yaw to Hold, allowing the flight maneuver to continue during the period of connection loss. For beginners, we recommend using Auto.
Auto Option
Auto dictates that channels assume central positions for Roll, Pitch, and Yaw during Failsafe while the throttle lever goes low. Betaflight defaults to this behavior during Stage One Failsafe.
When Auto is set, you’ll notice the drone ‘twitching,’ indicating a lost connection. If this is undesirable, Hold is an option.
Aux Channels: Utilizing Auxiliary Channels for Additional Failsafe Functions
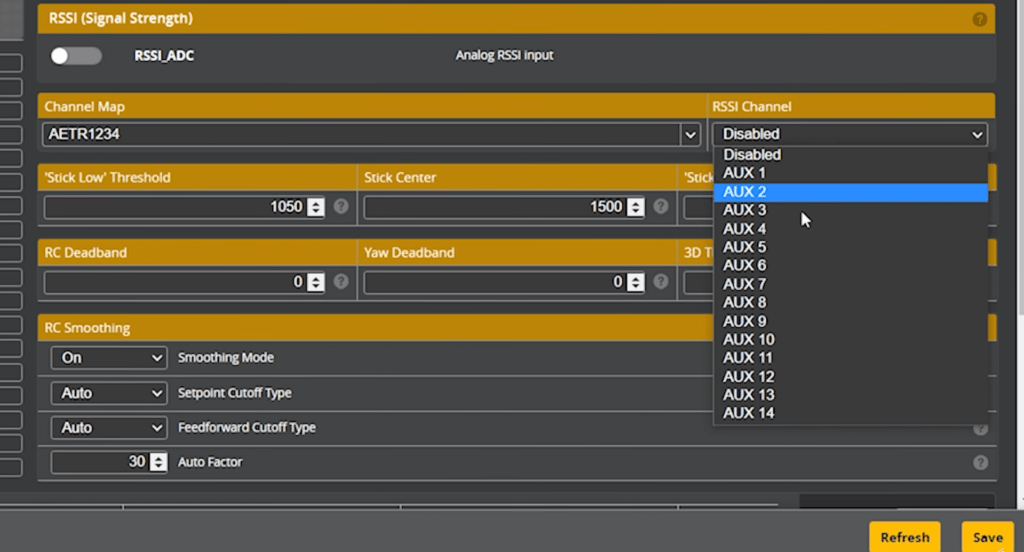
Auxiliary channels, defaulting to holding their last value during failsafe, offer additional configurability. Consider setting a fixed position for aux channels, especially when using features like the RSSI channel function. This ensures consistency in readings during failsafe events.
Stage Two Failsafe: Implementing GPS Rescue, Return to Home, and Advanced Maneuvers
When the connection is completely lost, Stage Two Failsafe transitions to an seemingly counterintuitive action – disarming and allowing the drone to crash. However, this deliberate measure prioritizes safety. Flying without a link poses substantial risks, making disarming the safest recourse.
To configure failsafe in Betaflight, go to the Failsafe tab in the configurator. Here, you can set up both stage one and stage two fail safe, as well as configure the channel fallback settings. If you’re using a DJI system, failsafe is configured through the DJI Assistant software instead.
Default Behavior of Stage Two Failsafe
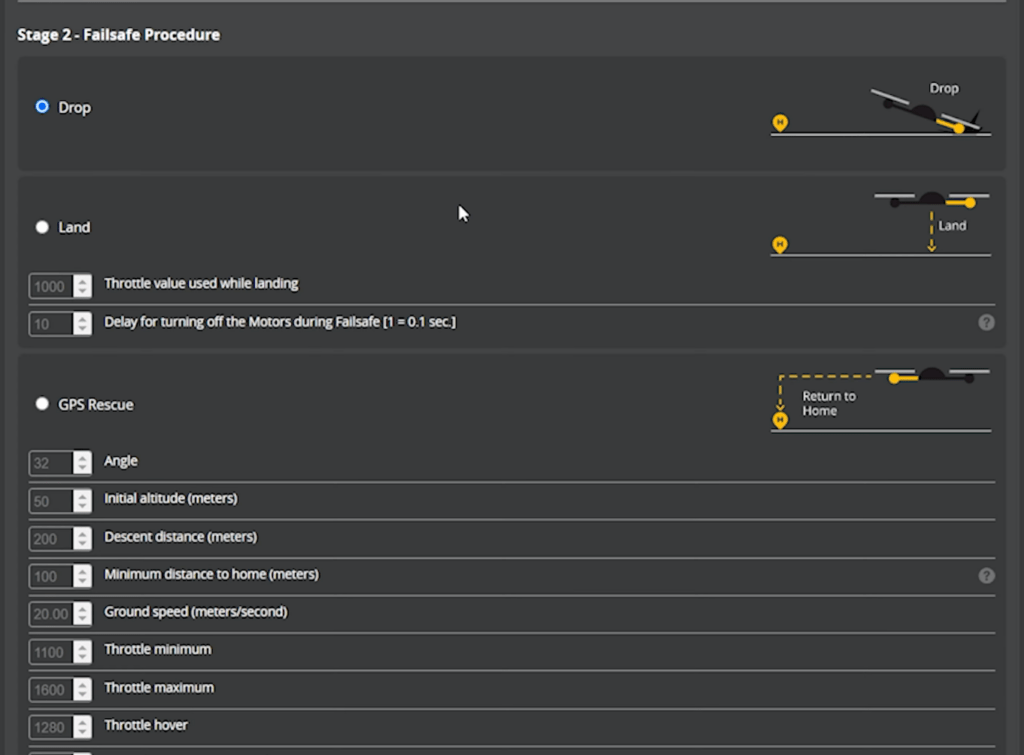
The default behavior of Betaflight during Stage Two Failsafe is to disarm (drop) to avoid uncontrolled flight and stop the propellers. Stage Two is triggered if the connection loss persists beyond the guard time in Stage One Failsafe. It is crucial to pay attention to Stage One Failsafe as a warning to potentially prevent the drone from entering Stage Two Failsafe, thereby risking loss or a crash.
Drop
The gold standard. Propellers off (no risk of injury from the propellers) and down by crashing. This is the best. Sounds strange, but it’s true. The main goal is to prevent the quad from flying further and burying its uncontrolled propellers in someone’s face. And we know approximately where it must be lying, so we can find it again.
Land
Landing. Better not. The basic idea here is to level the quad horizontally and then land with low throttle. Since the propellers are running uncontrolled the entire time, and you have no idea exactly where you are landing, it is not advisable. See face and propellers above.
GPS Rescue
GPS Rescue is a topic of its own. Learn more about it in the article here: GPS Rescue.”
Using the RSSI Channel Function
Betaflight’s RSSI channel function enhances the signal strength display on the OSD. However, during failsafe, accuracy may be compromised. To address this, set the failsafe position for the auxiliary channel hosting the RSSI signal to 1000. This ensures that the RSSI display in your goggles shows zero percent during failsafe.”
To learn more about RSSI and its importance in long-range FPV, see our article ‘Understanding RSSI: A Key Metric in Long Range FPV DJI Systems vs Analog Systems‘.
Setup Considerations: Locations and Time Factors
Failsafe setup can be performed in both the flight controller and remote. However, it’s typically executed in the flight controller, often through the Betaflight Configurator. Considering the time it takes for failsafe to activate is essential — keeping it short, for example, 300ms minimizes the duration of the potential uncontrolled flight.
Conclusion
Understanding and configuring failsafes are essential components of responsible drone flying. Prioritize the safety of others, configure failsafe settings according to your needs, and be aware of the nuanced settings in Betaflight and DJI systems. This way, you contribute to a safer and more responsible drone flying community.
One Reply to “Failsafe for FPV Drones: What is it and How to Configure It”